

March 9, 2020
The Complete Checklist for Preparing for a Shopify Migration


The Complete Checklist for Preparing for a Shopify Migration
This blog post was originally published by Deliverr, which is now Flexport. The content has been adjusted to fit the Flexport brand voice and tone, but all other information remains unchanged. With the merging of Deliverr’s services (DTC fulfillment, B2B distribution, and Last Mile delivery) into Flexport’s existing international freight and technology services, we’re now able to provide merchants with true end-to-end logistics solutions spanning from the factory floor to the customer’s door.
You’ve read the blogs, you’ve heard the hype, and now you’re ready to move your eCommerce website to Shopify. But where do you begin? We did some research and crafted a checklist for preparing for a Shopify migration. Going through the list will help ensure you can move to selling on Shopify seamlessly and start growing as soon as possible.
Checklist for preparing for a Shopify migration
Migrating to Shopify is a big step for your eCommerce business, opening you up to a new world of Shopify integrations, fast shipping tags, and increased mobile conversions. But first, there’s a little work to complete in preparing your existing website and Shopify store for a successful migration. Let’s begin.
1. Sign up and get started with Shopify
Before migrating to Shopify, you must sign up for Shopify. If you haven’t already, head to the Shopify signup page and fill in the required details, such as your email address, password, and store name.
You’ll then be directed to complete the initial setup steps, including adding your billing information, setting up a payment gateway, adding Shopify sales taxes, confirming your shipping settings, and selecting a unique URL.
2. Create the store you want to migrate to
Next, you need to create a Shopify store to migrate your products and data to. Depending on your technical expertise and budget, there are many free and paid Shopify themes for you or your designer to work with.
3. Identify the data and services to be migrated
Once your Shopify store is ready, it’s time to identify the information that you want to migrate. This could include products, images, customers, order histories, reviews, policies, and blogs. The more data you migrate, the less work you’ll need to complete later on.
You might want to use this as an opportunity to cleanse your data of anything that is out of date, no longer relevant, or simply not performing.
You also need to consider any services, software, and apps that you’ll need to update too. This could include inventory tools, multi-channel management software, and fulfillment partners. Make a list of who you need to inform, along with a list of any platform-specific apps or services that will require replacing.
4. Decide on the method of migration
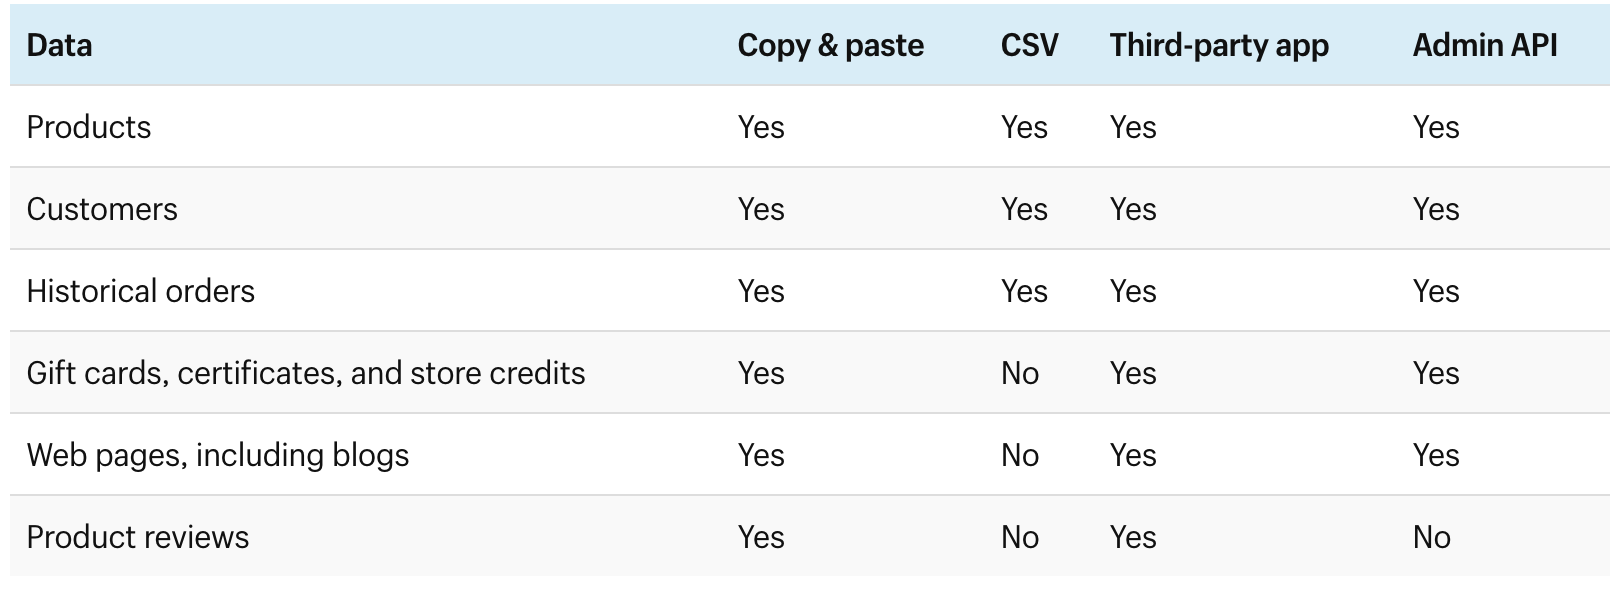
Depending on the data being migrated, there are four main methods to choose from.
- Copying and pasting
- CSV files
- Third-party Shopify apps
- Admin API
The following table lays out the available methods for each data set.
If you’re a Shopify Plus user, you can also use the Transporter app and command-line tool to complete your migration.
5. Prepare your data and services for migration
Whatever migration method you choose, it’s good practice to prepare your data and services for migration before the big move.
This includes:
- Removing specific protocols from your store assets (theme files, stylesheets, and images) by removing http: and https: from their URLs
- Ensuring all data is up-to-date and error-free
- Running and saving a complete backup of your existing data
- Agreeing on a migration date with your service providers
- Authorizing any relevant third-party access to your Shopify account
6. Export data from your current platform
If you’re using the Shopify Import store app to migrate your product, order, and customer data, you’ll need to export this information from your current platform first.
WooCommerce
- To export data from WooCommerce, from the admin page, click Tools > Export > All content > Download Export File
Squarespace
- To export products from Squarespace, from the home menu, click Commerce > Inventory > … > Export as CSV
- To export orders from Squarespace, from the home menu, click Commerce > Orders> Export as CSV
Etsy
- To export product data from Etsy, from the dashboard, click Settings > Options > Download Data > Currently for Sale Listings > Download CSV.
- To export customer and order data from Etsy, from the dashboard, click Settings > Options > Download Data > Orders > [Month/Year] > Download CSV
- To export order items data from Etsy, from the dashboard, click Shop Manager > Settings > Options > Download Data > Order Items > [Month/Year] > Download CSV
BigCommerce
- To export products from BigCommerce, from the dashboard, click Products > Export > Export Template and File Format Options > Default > Continue > Export my Product to a CSV file
- To export product details and variant data from BigCommerce, under Export Template and File Format Options, click Bulk Edit > Continue > Export my Product to a CSV file
- To export order data from BigCommerce, from the dashboard, click Orders > Export > Export Template and File Format Options > Default > Continue > Export my Orders to a CSV file
- To export customer data from BigCommerce, from the dashboard, click Customers > Export > Export Template and File Format Options > Default > Continue > Export my Customers to a CSV file
Big Cartel
- To export order and customer data from Big Cartel, from the dashboard click Orders > Shipped/Unshipped > More Actions > Download CSV
7. Import data into Shopify
To upload this product, customer, and order information to Shopify using the Import store app, download the app from the App Store and then from your Shopify admin menu, click Apps > Import store. Select the appropriate platform and then follow the on-screen instructions to import your data.
You must import this data in the following order:
- Products
- Customers
- Historical orders
Any other data can be imported by the methods listed above.
8. Review and update data
It’s advisable that you set aside time to review all migrated data to ensure that it has been copied over without error. For some methods of migration, you may need to manually enter information such as product dimensions, variations, or tags.
9. Set up redirects
It’s also good practice to set up redirects from your old platform to your new Shopify store. This ensures that anyone accidentally using old links or bookmarks can still find their way to your store and products.
To do this, log into your old platform, find the URL redirects section within your account setting, enter your old URL and the new URL, and then run a test.
10. Finishing touches
Finally, you’re ready to complete your Shopify set up and fly. This includes organizing products into categories, running test orders, scheduling your launch marketing, and then setting your site to live.
One final task
Before you sit back, relax, and appreciate your hard work, take a moment to see how you can boost your new Shopify store beyond your original website. You’ve now got access to a whole new suite of apps, integrations, partners, and resources – use them!
The contents of this blog are made available for informational purposes only and should not be relied upon for any legal, business, or financial decisions. We do not guarantee, represent, or warrant the accuracy or reliability of any of the contents of this blog because they are based on Flexport’s current beliefs, expectations, and assumptions, about which there can be no assurance due to various anticipated and unanticipated events that may occur. This blog has been prepared to the best of Flexport’s knowledge and research; however, the information presented in this blog herein may not reflect the most current regulatory or industry developments. Neither Flexport nor its advisors or affiliates shall be liable for any losses that arise in any way due to the reliance on the contents contained in this blog.
About the Author


